
To tie a kimono belt, start by holding the belt at your waist. Cross the right side over the left and tie a knot. Create a bow by folding the left side over the right. Adjust the bow to desired size and shape. Tying a kimono belt adds elegance and tradition to your attire effortlessly. Mastering this art enhances the beauty of wearing a kimono. Now, let’s dive into the detailed steps of how to tie a kimono belt with finesse.

Unlocking the Art of Tying a Kimono Belt
Picture this: a beautiful kimono draped elegantly around you, its vibrant colors and intricate patterns mesmerizing everyone around. But wait, something is missing – the perfect finishing touch, the kimono belt. How you tie the belt can make all the difference in how your kimono looks and feels on you. In this guide, we will dive deep into the art of tying a kimono belt, exploring different styles and techniques to help you master this essential skill.
Understanding the Kimono Belt
Before we delve into the intricate world of tying a kimono belt, let’s first understand its significance. The kimono belt, also known as an obi, plays a crucial role in not only securing the kimono but also adding style and elegance to the overall look. Traditionally, the obi is tied at the back of the kimono and comes in various lengths, widths, and designs, allowing for endless creativity and customization.
Choosing the Right Obi
The first step in mastering the art of tying a kimono belt is selecting the right obi. There are different types of obi, each tailored for specific occasions and styles. From casual cotton obi to luxurious silk obi, the options are endless. Consider the formality of the event and the design of your kimono when choosing the obi to ensure a harmonious and stylish look.
Basic Knot: The Taiko Knot
The Taiko knot is one of the most popular and versatile ways to tie a kimono belt. To achieve this classic look, follow these simple steps:
Step 1: Positioning
Stand in front of a mirror with the obi wrapped around your waist, ensuring that one end is longer than the other. The longer end will be used to create the knot.
Step 2: Looping
Take the longer end of the obi and create a loop, leaving a tail hanging down. Hold the loop in place with one hand while ensuring that it is centered on your back.
Step 3: Crossing
Cross the shorter end of the obi over the loop, creating an X shape at the front. Secure the crossed ends with one hand to prevent them from shifting.
Step 4: Tucking and Folding
Tuck the shorter end under the loop and pull it through the center. Gently tighten the knot while adjusting the folds to create a neat and symmetrical appearance.
Variations: Creating Your Unique Style
While the Taiko knot is a timeless choice, there are endless variations and styles to explore when tying a kimono belt. From the playful butterfly knot to the intricate drum knot, each style offers a unique twist to elevate your kimono look. Experiment with different knots and techniques to find the one that best complements your kimono and personal style.
Advanced Techniques: Mastering the Art
For those looking to take their kimono belt tying skills to the next level, mastering advanced techniques is key. From the layered obi look to the decorative bow knots, advanced techniques allow for endless creativity and customization. Practice different styles and techniques to become a true master of tying the kimono belt.
Accessorizing Your Obi
To add an extra flair to your kimono ensemble, consider accessorizing your obi with decorative pins, brooches, and cords. These accessories not only enhance the aesthetic appeal of your kimono but also allow for personalization and customization. Choose accessories that complement the colors and patterns of your kimono to create a harmonious and stylish look.
Tying a kimono belt is an art form that requires practice, patience, and creativity. By understanding the significance of the kimono belt, choosing the right obi, and exploring various knots and techniques, you can elevate your kimono look to new heights. Remember, the key to mastering the art of tying a kimono belt lies in experimentation and embracing your unique style. So, next time you don a kimono, take the time to tie your obi with care and precision, and watch as your ensemble transforms into a work of art.
Tie Your Kimono Obi Belt in 2 Minutes!
Frequently Asked Questions
How do I tie a kimono belt?
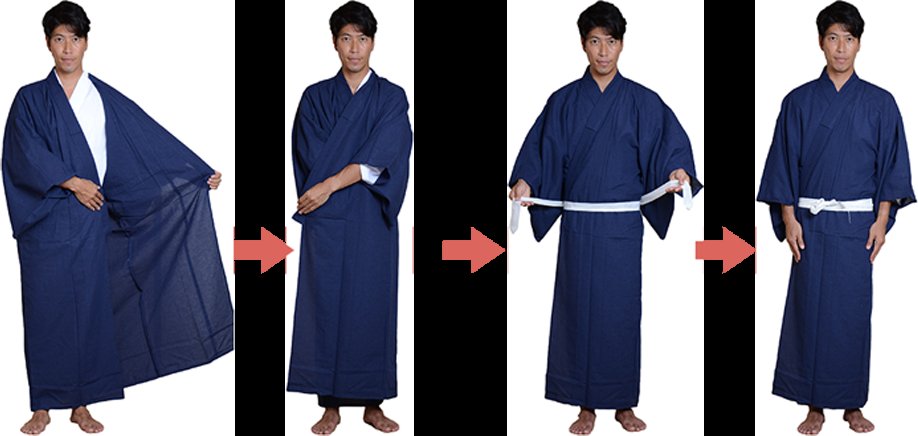
To tie a kimono belt, start by wrapping it around your waist with the garment closed in the front. Cross the right side over the left and bring the belt ends to the back. Then, tie a small knot by tucking the right end under the left and pulling it up through the loop. Adjust and flatten the belt as needed for a neat finish.
What is the traditional way to tie a kimono belt?
The traditional way to tie a kimono belt is to have the right side cross over the left. This represents the way deceased individuals are dressed in Japan, so it’s considered appropriate for the living to have the left side over the right.
Can you provide tips for securing the kimono belt firmly?
To ensure the kimono belt stays secure, make sure to tie the initial knot tight enough. You can also tuck the loose ends of the belt into the folds of the kimono to prevent them from coming loose during wear. Additionally, practice tying the belt a few times to find the right tension that works for you.
Final Thoughts
In conclusion, mastering how to tie a kimono belt is an essential skill for wearing a kimono properly. By following the step-by-step instructions provided, one can achieve a beautifully secured and aesthetically pleasing knot. Remember to practice and perfect the technique to ensure a snug and elegant fit. With patience and attention to detail, anyone can confidently tie a kimono belt with ease.