
Tying a flat knot is simpler than you might think. Start with two strands of rope crossed over each other. Loop one end under the other, then pull tight. This versatile knot is perfect for securing items or creating decorative designs. Ready to elevate your knot-tying skills? Let’s dive into the step-by-step guide on how to tie a flat knot effortlessly.

How to Tie a Flat Knot: A Step-by-Step Guide
Introduction
Learning how to tie knots can be both fun and practical. One of the simplest yet useful knots to master is the flat knot. Whether you’re out camping, fishing, or just need to secure something in place, knowing how to tie a flat knot can come in handy. In this guide, we will walk you through the steps of tying a flat knot, explaining each step in detail along the way.
Benefits of Knowing How to Tie a Flat Knot
Before we dive into the actual tying process, let’s explore why learning to tie a flat knot is useful. Flat knots are versatile and can be used for various purposes such as securing packages, creating friendship bracelets, or even in crafting projects. By mastering the flat knot, you’ll have a valuable skill that can be applied in multiple situations.
Materials Needed
To practice tying a flat knot, you will need a piece of rope or string. Choose a material that is not too slippery to ensure that the knot holds well. You can also use different colored ropes to make it easier to distinguish the steps.
Step-by-Step Guide on How to Tie a Flat Knot
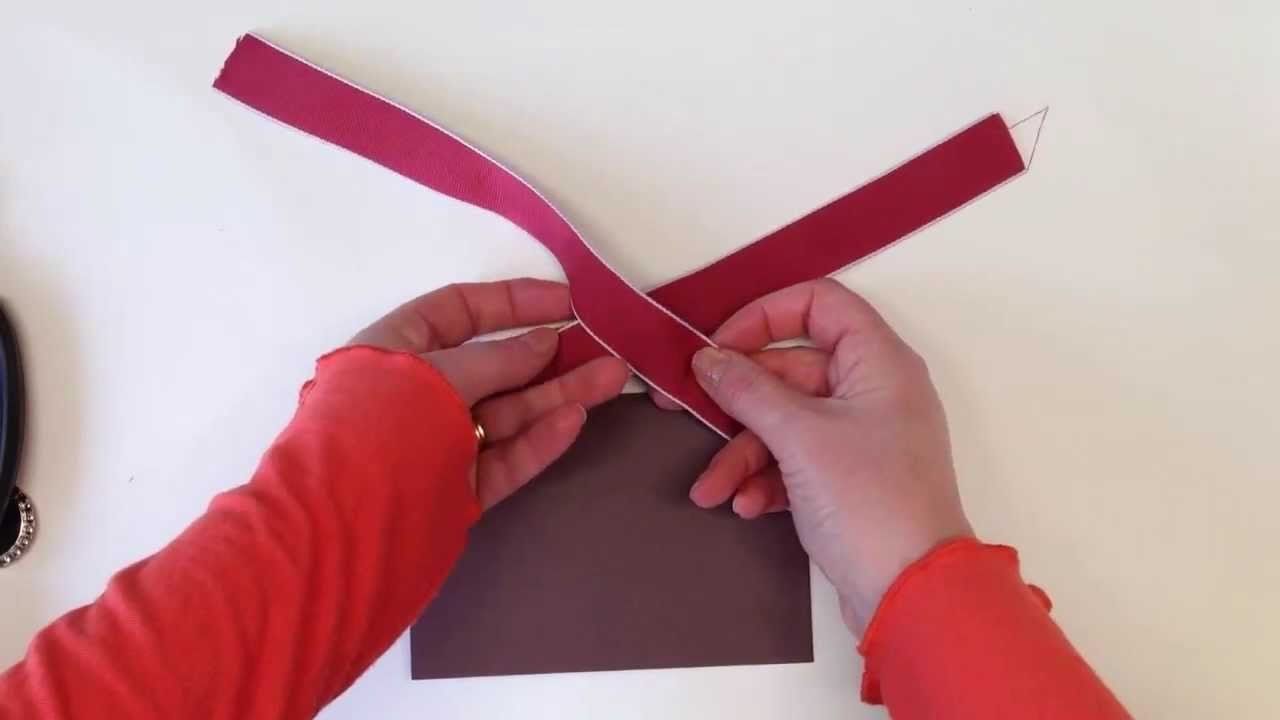
Step 1: Start with Two Ends
Begin by holding one end of the rope in each hand. Make sure the ends are even to create a symmetrical knot.
Step 2: Cross the Ends
Take the end in your right hand and cross it over the end in your left hand. Imagine making an “X” with the ends of the rope.
Step 3: Create a Loop
Next, bring the end that is now in your left hand over the other end to form a loop. The loop should resemble a pretzel shape.
Step 4: Tuck the End
Take the end that you just looped and tuck it under the other end, passing it through the opening of the loop you created in the previous step.
Step 5: Tighten the Knot
Gently pull both ends of the rope to tighten the knot. Make sure to adjust the knot as needed to ensure it lies flat and is securely fastened.
Tips for Tying a Perfect Flat Knot
– Practice makes perfect: Don’t get discouraged if your first few attempts don’t turn out perfectly. Keep practicing, and soon you’ll be tying flat knots with ease.
– Maintain even tension: Pay attention to the tension of the rope as you tie the knot to ensure that it is secure.
– Double-check your steps: It’s easy to get confused when first learning a new knot. Take your time and double-check each step along the way.
Congratulations! You’ve now learned how to tie a flat knot. With a bit of practice and patience, you’ll soon be able to tie flat knots quickly and confidently. Remember to experiment with different types of rope and use your newfound skill in various situations. Knot tying is a valuable skill that can come in handy in many aspects of life. So, go ahead and practice your flat knot-tying skills, and have fun mastering this essential technique!
How to tie a flat knot
Frequently Asked Questions
How do I tie a flat knot securely?
To tie a flat knot securely, start by crossing the left end over the right end. Then, bring the left end under the right end and pull it through the loop created. Finally, tighten the knot by pulling both ends simultaneously until it is snug.
Can I use a flat knot for crafting projects?
Yes, a flat knot is great for crafting projects that require a neat and secure finish. It works well with various materials such as string, yarn, or cord, making it versatile for different DIY projects.
Are there any tips for mastering the flat knot technique?
Practice is key to mastering the flat knot technique. Start by using two different colored cords to clearly see the crossing pattern. Take your time to ensure each step is done correctly, and soon you’ll be tying flat knots effortlessly.
Final Thoughts
To conclude, mastering how to tie a flat knot is a valuable skill. By following the step-by-step instructions provided, you can easily create this versatile knot for various practical and decorative purposes. Whether you are a beginner or have experience with knot tying, practicing the flat knot technique will enhance your knotting capabilities. So, grab your rope and start practicing today to perfect the art of tying a flat knot effortlessly.


+ There are no comments
Add yours